 The Judge
RAVES!
Date: 08/01/18
A Happy Landing
Yes, my dears, it's time to bore you to the boards once more with an update to The Great Winter Project™.
New readers start here: the carpets upstairs and on the stairs themselves, having become so threadbare as to be a threat to life and limb, were all taken up in October 2015. This left me with bare floorboards in all three bedrooms, the bathroom and the lavvie, and on the landing and the stairs.
The genius idea I had was to sand and stain the boards, to at least save the hassle and expense of re-carpeting throughout. So I set to it.
By January 2016, all three bedrooms, the bathroom and the bog had been done to my satisfaction (and, it must be said, inordinate pride). I had started on the landing when my pulmonic valve decided it was going to throw a strop and - what with the effects of that and the surgery to ameliorate the problem - it was only about eight weeks ago that I decided to take things further.
The boards on the landing were in quite a state. I don't mean in terms of solidity or stability; they passed muster on those counts. It's just that, over the long decades, in addition to the inevitable ground-in dirt, previous tenants had applied, variously, some sort of dark brown varnish and at least one layer of white paint. This would all have to come off.
I had had at them with my brother's heat gun and with my newly-acquired Makita belt sander when I started the whole Project. However, the gunk wasn't ready to be parted from the wood by the former, and the latter technique suffered from the boards' inevitable uneven-ness, and so the belt sander only did, at best, a third of the required job.
So, in approaching the matter anew, I had to get down to the (literal) nitty-gritty. I started as an experiment with the six boards nearest to the door of the small bedroom. However, as I had not figured out a satisfactory method of getting rid of the paint residue, those parts worst affected didn't 'take' the stain very well. By this time, I was in a 'sod it' frame of mind and just left them as they were. In this as in other aspects of my domestic environment, I take the view that it's only me who ever sees it, so what the hell?
Doing the remainder was a matter of the vigorous application of 40-grade sandpaper. While this weapon eventually produced a satisfactory result in those areas not covered by varnish or paint, the parts which were surfaced with crap needed something more drastic. I had realised by this point that the white paint was not gloss as I had previously assumed, but emulsion. This meant that it had soaked into the grain, and the only way of getting rid of it was to set to work with a scraper to effectively remove the top layer of wood from the boards. This at least left a pitted and grooved effect (even after further wielding of the sandpaper) which gave the boards a bit of character.
Finally, after four or five weekends of work, it was ready to take the stain. I had originally hoped to get it done on Wednesday and Thursday of last week, but an enforced journey to Manchester and the need to do just a bit more to get rid of the remaining emulsion meant that it was Friday morning before I was able to make a start.
The problem which was always going to present itself at this point was exactly how I was going to be able to put the stain on without marooning myself either in my bedroom or downstairs. I finally worked out a plan, and did much of the inside of the 'curve' (which is actually right-angles, but you know what I mean) on the Friday, along with the board which went across the front of the bathroom and bog doors. This way, I would still be able to walk along the outer side with just a little over-step necessary to get into those rooms.
I had a little bit of stain left in the tin I had originally bought over two years ago, but it was - due to the time elapsed since it was last used - covered with a thick skin which had to be prodded through with the handle of an old toothbrush to get at the remaining liquid.
It wasn't a long-winded job to brush copious amounts of the stain in, but the problem was in having to leave all the upstairs windows open for most of the day to mitigate the fumes. Both the smell (and that of the white spirit - brushes, cleaning, for the use of) and the cold air permeated the house all day until I finally had to close the windows shortly after 17:00.
The blurb on the stain tin claimed that it would be touch-dry in about six hours. I knew better from experience, and that - with the thickness of coat I had applied - it would be a lot longer than that. Sure enough, it was just about dry when I went to bed shortly after midnight.
Late Saturday morning found me wielding the brush again in order to finish the job off. Finally, shortly before noon, the task was complete, and I was left to alternately suffocate and freeze until I deemed it safe and/or prudent to close the windows again.
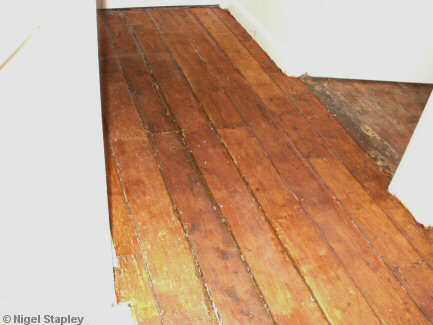
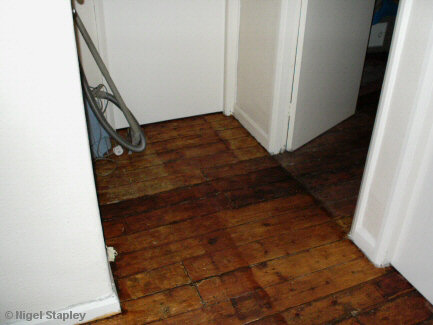
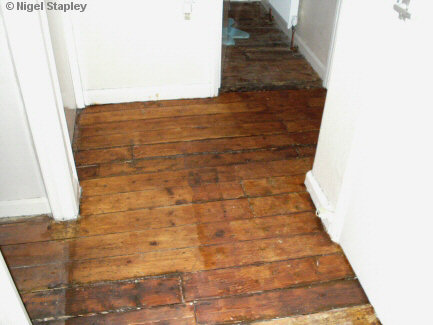
And how does it all look now?
(I have no pictures of how it looked before, by the way; the whole wretched sight had been a source of shame, embarrassment and reproach to me, so I never took any).


Yes, I know the shading isn't regular. That's partly because the underlying boards weren't the same shade either, but also because of having to do the whole thing in stages. Also, the lighter colour by the left-hand door in the last picture is because I was reluctant to open a brand-new tin of stain, and so had to make do with what was left at the bottom of the first tin. When it comes time to stain the stairs (which may be a few weeks, because the problem with the white emulsion is evident there in spades), I will go back and touch up wherever needed.
File under: Me, Yay!


 The Judge
RAVES!


